Attacking the Golden Ring on AMD Mini-PC
(or how to bypass Windows strongest security boundary)
TL; DR
In December 2019 AMD announced that their partners will start manufacturing a new high performance product line- AMD MiniPc. This MiniPc is actually a direct competition to the well known Intel NUC and Gigabyte Brix. In this post I will show full research and exploitation for 1 of the 3 vulnerabilities I found in the UEFI image and reported to AMD. Specifically speaking all three vulnerabilities reside in SMM (Ring -2) code which is part of the UEFI image. SMM is the most privileged code that can execute on x86 CPU thus allowing to attack any low level component including Kernel and Hypervisor.
The vulnerability in this post allows arbitrary ‘write primitive’ to any location in SMRAM and as consequence execute attacker code in SMM mode. While executing in SMM I will show how it is possible to attack Windows Hypervisor and thus bypass HVCI -hypervisor code integrity. HVCI is a wonderful design and technology which eliminates any chance to run attacker code in Kernel mode. Some think that SMM vulnerabilities are not generic, this is actually not true, there are two major BIOS vendors -AMI and Phoenix that own huge amount of the code in any UEFI image no matter which CPU, Chipset, Motherboard this PC uses. Thanks much to Saar Amar @AmarSaar and Alex Matrosov @matrosov for reviewing the article. Good words also to AMD and ASRock for their fast response and quick fix release.
Timeline-
CVE-2020–14032; Severity High; 2/4/20 reported; 16/4/20 approved as vulnerability; 8/6/20 fixed version released. (by ASRock)
CVE-2020–12890; Severity High; 2/4/20 reported; 16/4/20 approved as vulnerability; Not fixed yet. (by AMD)
CVE-2020–00000; Severity High; 2/4/20 reported; 16/4/20 approved as vulnerability; Not fixed yet. (by ASRock)
What is SMM
While you probably know Ring 3 (user mode), Ring 0 (kernel mode) and Ring -1 (hypervisor mode) SMM is referred as ring -2. SMM is actually the most privileged execution on the main x86 CPU which means that the CPU might interrupt at any moment and switch to SMM execution mode. If you want to learn more, a great training is provided by Alex Matrosov on UEFI internals.
SMM code loaded to special protected memory region– SMRAM so when the PC boots the SMM drivers, which are part of the UEFI image and stored on the SPI flash, are loaded to SMRAM. Once SMM drivers are loaded to SMRAM, this region is locked and the memory controller cannot access these addresses unless the CPU is in SMM mode. From this point SMM world is parallel to OS execution and there is no way to change SMM code after your PC finishes the ‘bios’ boot. SMM drivers have some different purposes but mainly responsible for propriety CPU and chipset configurations, mother board manufacturer code, secured operations such as setting secure boot hashes, TPM configurations and power management.
While the CPU switches to SMM it starts the execution inside SMRAM at SMBASE + 0x8000. SMBASE value is set at boot process and is saved internally in CPU MSR register which is accessible only from SMM mode. Each CPU core has its own SMBASE value because each core needs its own saved state data at constant offset from SMBASE. SMM execution starts in 16 bit real mode and very quickly changes to long mode 64 bit. Usually the main flow of SMM execution consists of Interrupt Dispatcher which calls the relevant SMI handler for this SMM interrupt, the most common SMM interrupt is software interrupt which can be triggered only from kernel code by writing the SMI number to APMC I/O port. It is important to note that when CPU switched to SMM the current state (registers and more) is saved to SMM State Save area which exists for each CPU core. SMM State Save area resides at SMBASE+0xFE00 and as said before each core has slightly different SMBASE.
When code executes in SMM the whole physical memory is accessible and nothing can stop you from overwriting critical data in kernel or hypervisor physical pages. SMM code acts as it is kind of mini OS -it has I/O services, memory allocation services, ability to allocate private interfaces, SMM interrupts management, events notifications and more.
To summarize- SMM code is the most privileged executed code on the CPU, the code is completely hidden from the running operating system, it cannot be modified by kernel and even by DMA devices and most important SMM code can access any physical memory.
Reversing the vulnerable SMM module
My research was done by static manual reversing so we will see the details of each step at my progress. The vulnerable module meets perfectly my first criteria for SMM bugs hunting — it implements SMI (SMM interrupt) handler which can be triggered from OS kernel code. To show the different SMM drivers from UEFI image it is best to use UEFITool, when you open the image you will see about 40 SMM drivers and each SMM driver has its dependencies. These dependencies are actually interfaces that must be already installed when SmmCore driver needs to decide who is the next SMM driver to be loaded to memory. One of such dependencies is EfiSmmSwDispatch2ProtocolGuid which is used to register SMI handler. So just by statically looking at the dependencies you can guess that this driver registers and handles SMM interrupt. To be sure if it indeed registers SMI handler you need to dump the whole SMRAM area and look for a linked list with header ‘DBRC’ or ‘SWSM’ or ‘SMIH’, each node in the list contains the SMI number and SMRAM address of the handler. The problem is that there is no way to dump SMRAM but only with a physical hardware debugger.
One of the modules that use EfiSmmSwDispatch2ProtocolGuid is SmiVariable driver. This driver’s general purpose is to update specific UEFI variables from SMM code. UEFI variables are several dozens of usually persistent variables that are stored directly on the SPI flash where the UEFI image is stored. These UEFI variables store different information such as OS configuration, TPM configuration, Secure Boot keys and hashes and some of these variables can be set directly from Windows OS or as in our case from SMM code.
The main driver entry point calls the Init_SMI_Handler function as can be seen in next figure:
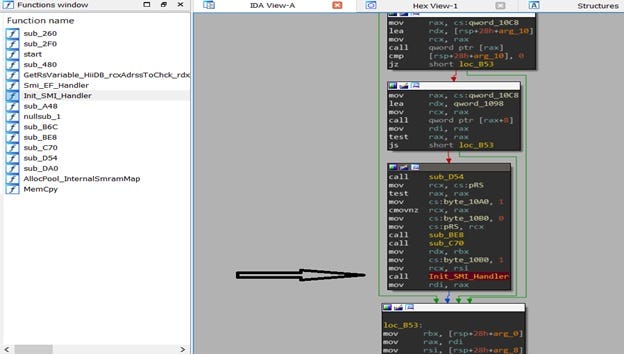
Init_SMI_Handler function gets a pointer to the EfiSmmSwDispatch2 interface and registers SMI handler 0xEF. SMI 0xEF handler implements a wrapper logic for setting/getting data to/from UEFI variable. As you can see in the next figure the handler gets a pointer to EFI_SMM_CPU_PROTOCOL and reads from the CPU ‘saved state’ the value of register RSI. This RSI value is totally attacker controlled and is set in kernel code just before SW SMI is triggered by writing to APMC I/O port 0xB2.
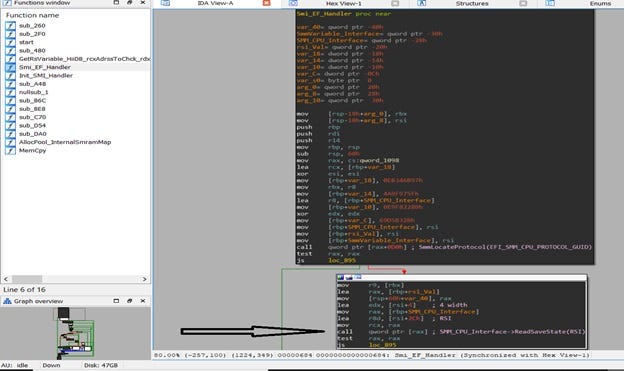
After this, the handler gets a pointer to EfiSmmVariable interface which is the main interface that stores/reads data to/from UEFI variables. There is some strange flow done by calling a function pointer with RSI value as argument but the function pointer is NULL so the flow skipped.
RSI value from previous step is used as a pointer to a buffer which holds at offset 0x1 “operation selection id” and at offset 0x4 a pointer to a struct of arguments for set/get a UEFI variable. If offset 0x1 equals to “1” then the flow will read data from UEFI variable.
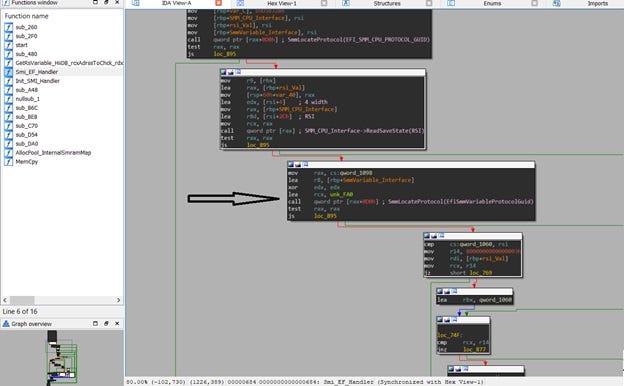
In the next figure you can see how read data from UEFI variable is done -the previously obtained pointer to EfiSmmVariable_Interface is used to call SmmGetVariable() with arguments supplied as a struct pointed by the value in RSI+0x4.
This is the layout of attacker controlled surface:
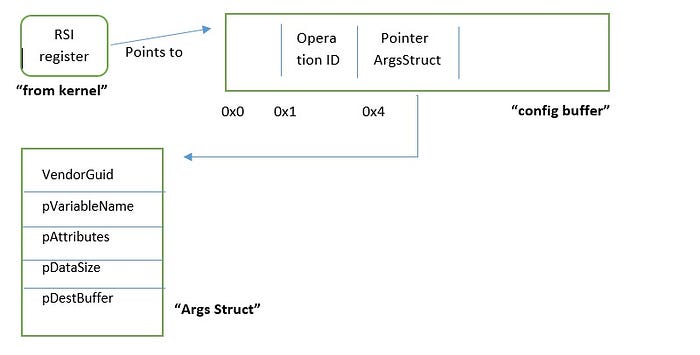
As you can see the values (pointers) from the ArgsStruct are used directly “as is” without any validation. SmmGetVariable function has a simple task it uses the ArgsStruct values to find the correct variable then read its data and then store the data in a buffer. All these values are attacker controlled because RSI register value is also attacker controlled, we will see full details in the pre-exploitation step.
From vulnerability to exploitation -HVCI bypass
So till now we got 3 important steps:
- We control the value of RSI register because it is saved in CPU SMM ‘state save’ area and being read by SMI handler 0xEF when the SMI is triggered.
- Because RSI points to a buffer which points to ArgsStruct we actually control all the arguments for the SmmGetVariable() function.
- No validations are done on RSI value or on the inner pointers in the buffer that RSI is pointing to.
At this moment if an attacker is able to set its own value (shellcode) in a UEFI variable and control the destination buffer of SmmGetVariable() this is a game over situation because it will allow to write our shellcode to SMRAM.
Luckily steps 1+2+3 exactly suit for a perfect exploitation.
Pre Exploitation — building write primitive:
- Prepare “config buffer” with offset 0x1==1 and offset 0x4==address of “Args Struct” which will be 0x810 at my exploitation. I will put the “config buffer” at physical memory 0x800 which is on most PCs an empty area.
- Prepare “Args Struct” buffer starting from physical memory 0x810. At offset 0x0==variable GUID; offset 0x10==address of variable name (0x850); offset 0x14=0; offset 0x18==address of data size(0x830); offset 0x1c==address of destination buffer(0x840).
- At location 0x850 put your variable name in Unicode, I will use “SmmRootkit”. At location 0x830 put your shellcode size. At location 0x840 put your destination address in SMRAM where the shellcode will reside.
- From Userspace use Windows API SetFirmwareEnvironmentVariable() to create new UEFI variable named “SmmRootkit” and its value set to your favorite shellcode.
- Trigger SMI handler 0xEF by writing to I/O port 0xB2. We will need to trigger the SMI with an RSI register value controlled by us. RSI must point to the “config buffer”-0x800 at this example.
Pay attention that RSI must be set just before writing to the I/O port.
If you follow these steps the result is a generic write what where primitive that allows you write any data to SMRAM. As you might remember there is no way to write to SMRAM once it is locked during boot. In my example the vulnerability exists in SMM code so it can definitely write to SMRAM.
HVCI bypass Exploitation
Once we have a write primitive to SMRAM we are close to game over. But first of all what is HVCI?
I will not dive here in to details because it is a whole huge topic to discuss, but generally what you need to know is:
- In the last years Windows moved its security to VBS — virtualization based security.
- VBS uses Windows hypervisor (Hyper-V) to create 2 worlds Normal(vtl0) + Secure(vtl1).
- Hyper-V manages the two worlds and works closely with the main CPU(VM instructions) .
- In such a design we get isolation between worlds of sensitive and critical functionality such as HVCI, CredentialGuard and more.
- The kernel that manages VTL1 is Securekernel which runs in ring0 VTL1, SecureKernel has limited system calls and is about 90% less in size than regular Kernel.
- HVCI main security boundaries:
- Any code that is loaded to Kernel must be signed otherwise it will not execute.
- There is no possibility to allocate RWX pages in Kernel.
- There is no possibility to add W attribute to RX (code) page.
7. HVCI uses EPT (extended page table) which maps all OS “physical addresses” to real system physical addresses. This means that page permissions (R/W/X) are stored not only in the OS page table but also in EPT. EPT is maintained by hypervisor and there is actually no way to change EPT from user or kernel mode.
8. As a result, every violation in kernel page permissions will be caught immediately because OS page permission will differ from the permissions of the same page in EPT.
Now let’s say that VTL0 kernel asked for some security checks from VTL1 before it will start executing kernel code. One possibility to attack the design is to run malicious code in VTL0 kernel space (not a trivial task at all) and change the security results that came from VTL1. In such scenario HVCI will stop the attack because the page permission in EPT will remain Write or eXecute — you cannot allocate RWX page at all and if you allocate RX page and add Write afterwards, still in EPT it will remain RX. As a result HVCI will not allow code execution on this kernel page.
The only way to run kernel malicious code is to find the attacked page (PTE) in EPT and change the permission to RWX but as you already know you cannot access EPT from user/kernel mode.
In my example, HVCI will be running and I will write and execute shellcode to an existing read only page inside ACPI.sys driver module.
How is it possible?
Here comes the power of SMM-from SMM code you can access any physical page and thus you can change EPT, but one problem still exists you don’t know where is EPT located. Here SMM also helps us because each time CPU switches to SMM it saves in “state save area” (SMBASE+0xFE00) a pointer to VMCB Physical Address and inside VMCB we have the physical address of EPT. SMBASE address is the same at each boot and across same PCs so simple SMM shellcode can find the physical address of EPT, on AMD architecture –
1. VMCB address = SMBASE+0xFE00+OffsetTo(VMCB Address)
2. EPT address = VMCB address+0xB0
Exploitation Steps SMM shellcode
- The shellcode will get EPT physical address from VMCB+0xB0.
- Use OS physical address of the attacked page (see bullet 3 next section) to parse the EPT and find the corresponding page permissions in EPT. This is very similar to the standard page table walk CR3->PML4->PDPT->PD->PT. Pay attention i had 2MB pages so the walk is slightly different.
3. Change the permission from R to RWX.
Exploitation Steps Windows OS
Make sure HVCI is enabled and running. At this exploit I will use private read/write primitives to kernel but this is out of scope because we are dealing with ring 0 to ring -2 privilege escalation.
- I will get kernel virtual address of .rdata page from the ACPI driver at offset 0x7E100 (build 19H2 November 2019). This page is with (R)ead only permissions and has some empty space for a short “hello SMM rootkit” shellcode.
- I will get this page PTE and change page permissions to RWX using a write primitive to kernel. Windows has an array of all PTEs at a specific address which is called PTE_BASE. This value is randomized but you will see how to get this value in the POC. Once you have PTE_BASE your PTE will be at offset Page VirtAddrss / 2⁹, this because each page table (2¹² size) maps 2MB of virtual memory(2²¹ size).
- Change permissions in PTE from R to RWX. Also from the PTE get the physical address of the page and use it in the SMM shellcode when parsing the EPT.
- I will use a kernel write primitive to write simple “hello SMM rootkit” assembly to the kernel page from step 1.
- Use the SMRAM write primitive, as described in the pre-exploitation section, and write the SMM shellcode so you overwrite any SMI handler of your choice, let’s say SMI 0x30.
- Trigger SMI 0x30 by writing the value 0x30 to APMC I/O port 0xB2.
- From now the kernel page from step 1 is marked RWX also in EPT.
- Call yours “hello SMM rootkit” shellcode from step 4 and it will execute. Use DbgView from SysInternals to see the print from kernel.
- HVCI bypass succeeded — we wrote and executed our shellcode to Read only page.
In case you wondered, if you just changed to page permissions from R to RWX without using the SMM shellcode to update EPT, the result when execution happens would be BSOD with unrecoverable Exception.
POC video: https://youtu.be/yUrb3lzl-Fo
Conclusion and possible mitigation
The root cause of this SMM vulnerability is in lack of checks on the destination buffer address when calling SmmGetVariable() in SMI handler 0xEF. As a result attacker achieves generic write primitive to the most protected memory, SMRAM, and from now code execution in SMM is a trivial task as already explained. Code execution in SMM is a game over for all security boundaries such as SecureBoot, Hypervisor, VBS, Kernel and more.
This vulnerability was fixed by adding several checks to destination buffer and other pointers such that they do not point to SMRAM regions.
During last year Windows introduced its Secured-Core PC which tries to enforce UEFI code to implement SMM monitor and audit but it will take long time to adopt these changes if at all. In the upcoming Blackhat USA 2020, Saar Amar and Daniel King will drop 2 critical vulnerabilities in the Securekernel which bypass VBS boundaries.
One of the attack vectors with code execution in SMM is writing persistent malware to the SPI flash where UEFI image exists. Such attack would be eliminated if Intel BootGuard is correctly working but it will not help in the case presented in this research because all modifications are done at runtime when boot is already finished.
For comments and questions you can contact me at: danny.odler@gmail.com
References:
- https://www.blackhat.com/us-20/briefings/schedule/#breaking-vsm-by-attacking-securekernel-20382
- https://github.com/saaramar/Publications/blob/master/BluehatIL_VBS_meetup/VBS_Internals.pdf
- https://medium.com/@matrosov/bypass-intel-boot-guard-cc05edfca3a9
- https://medium.com/@matrosov/uefi-vulnerabilities-classification-4897596e60af
- http://blog.cr4.sh/2016/02/exploiting-smm-callout-vulnerabilities.html
- http://blog.cr4.sh/2015/07/building-reliable-smm-backdoor-for-uefi.html
- https://github.com/tpn/pdfs/blob/master/Battle%20of%20SKM%20and%20IUM%20-%20How%20Windows%2010%20Rewrites%20OS%20Architecture%20-%20Alex%20Ionescu%20-%202015%20(blackhat2015).pdf
- https://www.synacktiv.com/posts/exploit/through-the-smm-class-and-a-vulnerability-found-there.html
- https://github.com/tianocore-docs/Docs/raw/master/White_Papers/A_Tour_Beyond_BIOS_Memory_Map_And_Practices_in_UEFI_BIOS_V2.pdf
- https://www.hardwear.io/berlin-2020/training/hunting-uefi-firmware-implants.php
